Allegro Hand Application Studio (User Manual)
If you have not yet installed Allegro Hand Application Studio (AHAS) or your CAN interface and driver, please see Allegro Hand Application Studio (Installation) before you read this manual.
Contents |
Running AHAS
When installing Allegro Hand Application Studio (AHAS), you were prompted to select an installation path where all files associated with AHAS would be stored. This installation path will be referred to as [installPath] from here on out.
Within the installation directory (at the top level), you will find a file titled Allegro.exe. Also, a shortcut to this executable should have been placed on your desktop during installation. Double-click Allegro.exe to launch AHAS for the Allegro Hand.
Which Hand?
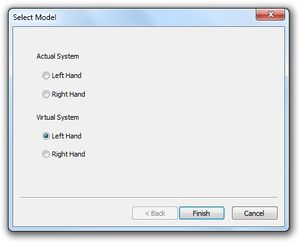
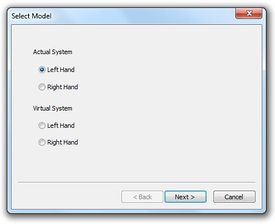
When you first run Allegro Application Studio (AHAS), you are prompted to select the hand (right/left/actual/virtual) you would like to use.
Actual
An actual system refers to the Allegro Hand hardware. If an actual system is selected, AHAS will load the corresponding (left/right) virtual model and open CAN communication with the actual Allegro Hand. The virtual Allegro Hand seen along with the Actual System simply mimics the joint kinematics (no physics or contact dynamics) of the actual system based on the encoder values obtained over CAN. Motion commands from AHAS are send directly to the actual system while the encoder feedback controls the AHAS virtual hand.
Virtual
If a virtual system is selected, a dynamic simulation is run using the Allegro Hand virtual model. This simulation includes full physics simulation including contact dynamics. The virtual system can be simulated without the actual system. This ability is useful for testing algorithms in a dynamics environment before trying them out of the actual hardware.
Virtual Hand Simulation
First, we will select the Virtual Left Hand system and click Finish to start the simulation.
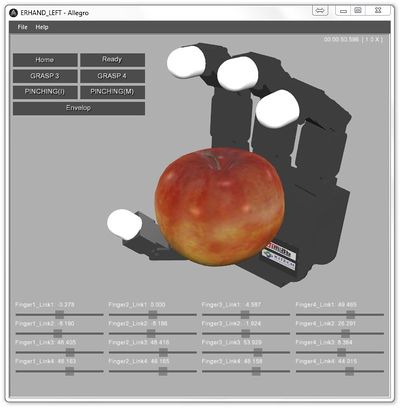
Selecting either virtual hand system at the Allegro Hand Application Studio (AHAS) hand selection prompt will load the AHAS dynamics simulation environment and a virtual hand model. The simulation begins running as soon as the AHAS simulation window is loaded.
AHAS is provided along with the Allegro Hand for two main purposes. AHAS allows for ease of testing CAN communication between your PC and the Allegro Hand hardware. Secondly, AHAS provides several robust grasping algorithms for use with the Allegro Hand. The algorithms provided with AHAS can grasp a variety of object geometries for demonstration or for use at the end of a manipulator.
The grasping algorithms provided with AHAS can be explored via the graphical user interface (GUI) buttons at the top-left of the AHAS simulation window. Clicking these buttons will send a command to the virtual CAN device on the virtual Allegro Hand model.
Home
Let's start by clicking the button entitled Home. The position assumed by the Allegro Hand is a starting position that ensures that all joints are oriented properly for executing a grasp.
Ready
Click the buttons entitled Ready to prepare for each type of grasping motion.
Note: For the virtual hand, you will notice the finger joints sagging if left in ready mode too long. As the finger tip locations are controlled, all joint angles do not necessarily matter. Due to the lack of friction found in the actual system, the ready position does not remain constant. In this case, simply push Home then Ready again to prepare for a grasp.
Grasp 3
Click the buttons entitled Home then Ready to prepare the hand for a grasp.
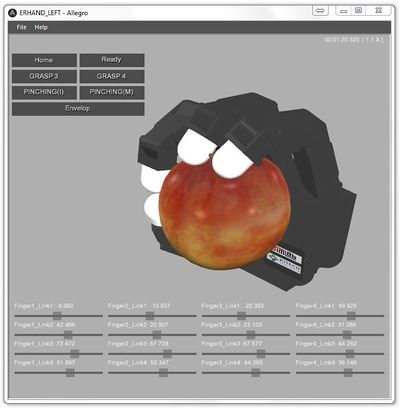
Now click the button entitled GRASP3. This grasping algorithm is a torque-controlled, three-fingered grip. This grasp can be used for pick-and-place style object grasping as the object is held between the tips of the thumb, index and middle fingers.
Grasp 4
Click the buttons entitled Home then Ready to prepare the hand for another type of grasp.
Click the button entitled GRASP4. This grasping algorithm is a torque-controlled, four-fingered grip. This grasp can be used for pick-and-place style object grasping as the object is held between the tips of the thumb and three fingers.
Pinching (I)
Click the buttons entitled Home then Ready to prepare the hand for another type of grasp.
Click the button entitled Pinching (I). This grasping algorithm is a torque-controlled, two-fingered pinch. This grasp can be used for pick-and-place style object grasping and more dexterous manipulation as the object is held between the tips of the thumb and the index finger.
Pinching (M)
Click the buttons entitled Home then Ready to prepare the hand for another type of grasp.
Click the button entitled Pinching (M). This grasping algorithm is a torque-controlled, two-fingered pinch. This grasp can be used for pick-and-place style object grasping and more dexterous manipulation as the object is held between the tips of the thumb and the middle finger.
Envelop
Click the buttons entitled Home then Ready to prepare the hand for another type of grasp.
Click the button entitled Envelop. This grasping algorithm can be used to fully envelop an object within the hand's four fingers. This algorithm can handle a variety of object geometries.
Test Encoders
This button is only used when zeroing the hand joints. Pressing this button will print out the current raw encoder data.
Test Motors
This button is only when checking the positive direction of each motor. Pressing this button multiple times will send a positive torque value to each motor in succession.
Sliders
The sliders at the bottom of the AHAS simulation window provide a secondary form of visual feedback for the sixteen joints of the hand. Each column represents a finger with link 1 being the yaw joint attached to the palm and link 4 being the last joint at the end of each finger.
Actual Hand
A new Allegro Hand, either virtual or actual, left or right, can be loaded by clicking New in the File drop-down menu (File > New). You can also open a new AHAS by hitting Ctrl+N on the keyboard.
Again, you will presented with the AHAS hand selection window. This time we will select the Actual Left Hand System. Don't click Finish yet!
CAN Connection
Note: If you have not yet installed your CAN interface and driver, please see Allegro Hand Application Studio (Installation) before you continue.
Wiring
v1.0
On the back of the Allegro Hand, you will see two connectors labeled J1 and J5. While these ports are identical in that they both offer CAN and power connections, J5 offers a switch making it favorable for power. CAN_L and CAN_H get plugged into ports 3 and 4, respectively, and Power GND and VCC get plugged into ports 1 and 2, respectively, on connector J5.
v2.0+
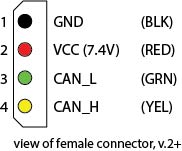
On the Allegro Hand v2.0, there is only one connector available to be used for both CAN and power. CAN_L and CAN_H get plugged into ports 3 and 4, respectively, and Power GND and VCC get plugged into ports 1 and 2, respectively, on this connector.
On the connector provided with the Allegro Hand, the wires are color coded such that power ground and voltage are a standard black and red, respectively, and CAN-Low and CAN-High are green and yellow, respectively.
Power
The Allegro Hand must be powered by 7.4VDC (7.0-8.1 VDC) and at least 5Amps. If a minimum of 5A is not provided, the motors will brown-out during grasping.
Once the power supply is on at the rated values, the power switch on the back of the Allegro Hand can be switched on (upward towards the fingers) to provide power to the hand.
AHAS
With the hand powered on and the CAN connected, it is finally time to run Allegro Application Studio.
A virtual Allegro Hand, left or right, can be loaded by clicking New in the File drop-down menu (File > New) or by quitting and reopening Allegro Application Studio.
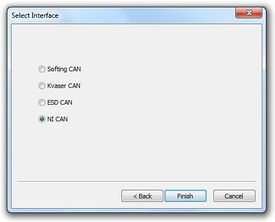
Again, you will presented with the AHAS hand selection window. This time we will select the Actual Left Hand System (or a right hand if that's what you have) and click Next to select the type of CAN interface you are using. Click Finish to start AHAS.
While the CAN communication is established at start-up, the motors must be turned on using the On button before commands can be sent and encoder values received.
Note: You should always straighten out all of the fingers before running Allegro Application Studio or any other hand control application (think High-Five). This habit poses the fingers as far away as possible from any collision that could occur in the event of unexpected motion. This pose also increases the reliability of the encoders in finding the hand's initial position.
Once the On button is pressed, the AHAS hand model is updated to reflect the actual Allegro Hand. Move the fingers around a bit manually to make sure the communication is, in fact, established.
For the actual hand, the same grasping algorithms can be executed via the GUI interface. You can use the hand to manipulate reasonably sized objects of many shapes. The virtual hand will continue to reflect any motion the actual hand makes.
Note: If using an older version of Allegro Hand Application Studio (as distributed with the Allegro hand v1.0) and a Softing or PEAK CAN device, you may need to copy the CAN driver .dll file into the bin directory of AHAS.
On you computer, locate either the PEAK CAN driver, PCANBasic.dll, or the Softing CAN driver, canL2.dll. Copy Either of these files to:
Allegro Hand Application Studio Installation Path / bin / XX.dll
If you cannot locate the drivers on your computer, the files below will likely work. Either way, the drivers must be installed using the installation method of either respective CAN device.
Quitting
You can quit Allegro Application Studio in two ways. First, you can quit by clicking Exit in the File drop-down menu (File > Exit). You can also quit by click the X button to the right of the AHAS window's title bar.
Copyright & Trademark Notice
Allegro, the Allegro logo, RoboticsLab, the RoboticsLab logo, and all related files and documentation are Copyright ⓒ 2008-2020 Wonik Robotics Co., Ltd. All rights reserved. RoboticsLab and Allegro are trademarks of Wonik Robotics. All other trademarks or registered trademarks mentioned are the properties of their respective owners.
Wonik Robotics's Allegro Hand is based on licensed technology developed by the Humanoid Robot Hand research group at the Korea Institute of Industrial Technology (KITECH).
Any references to the BHand Library or the Allegro Hand Motion and/or Grasping Library refer to a library of humanoid robotic hand grasping algorithms and motions developed and published by KITECH researchers.
J.-H. Bae, S.-W. Park, D. Kim, M.-H. Baeg, and S.-R. Oh, "A Grasp Strategy with the Geometric Centroid of a Groped Object Shape Derived from Contact Spots," Proc. of the 2012 IEEE Int. Conf. on Robotics and Automation (ICRA2012), pp. 3798-3804
Wiki maintained by Sean Yi <seanyi@wonikrobotics.com>
| Whos here now: Members 0 Guests 0 Bots & Crawlers 4 |
